Most people open NotebookLM, dump a PDF in, and ask it to summarize. That works. But you’re using maybe 10% of what this tool can actually do.
NotebookLM has had a serious glow-up. What started as a smart document Q&A tool is now a full research-to-output pipeline: podcast-style audio, interactive mind maps, slide decks, video summaries, quizzes, infographics, and a live two-way conversation with your AI hosts. All grounded in your own sources, so it doesn’t hallucinate things you didn’t put in.
Here’s what most guides miss: the features aren’t the point. The combinations are. This post walks you through 10 practical ways to get real work done with NotebookLM, from research to meetings to presentations, with actual step-by-step instructions you can follow right now.
It’s free. You just need a Google account to get started at notebooklm.google.com.
What NotebookLM Actually Does (Before We Get into the Tips)
The core idea is simple: you upload sources (PDFs, Google Docs, YouTube URLs, web pages, audio files, plain text), and NotebookLM builds a private AI assistant that only knows what you gave it. Every answer comes with a citation pointing back to the exact source. No guessing, no hallucinating things you didn’t include.
You can add up to 50 sources per notebook, up to 25 million words total. The Studio panel on the right is where you generate outputs: Audio Overviews, Video Overviews, Mind Maps, Reports, Slide Decks, Infographics, Quizzes, Flashcards, and more.
The free tier gives you the core features. NotebookLM Plus (available via Google One AI Premium or Google Workspace) unlocks higher limits and priority access to newer features.
Now, the actual tips.
Tip 1: Build a Personal Research Assistant for Any Project
The most underused feature of NotebookLM is also the most obvious: using it as a permanent knowledge base for ongoing work. Instead of re-reading documents every time you need a detail, you load them once and query them as needed.
How to do it:
- Go to notebooklm.google.com and click New Notebook.
- Name it after your project (e.g., “Q3 Market Research” or “Book I’m Reading”).
- Click + Add Sources and upload your PDFs, paste in URLs, or link Google Docs directly.
- Once loaded, start asking questions in the chat panel. NotebookLM will answer using only your sources and cite exactly where it pulled each answer from.
- Hit Save to Note on any useful answer to build a growing notes library inside the notebook.
Good use cases: competitive research, literature review, due diligence on a company, understanding a technical domain before a meeting.
Tip 2: Turn Dry Documents into a Podcast You’ll Actually Listen To
The Audio Overview is the feature that made NotebookLM go viral. Two AI hosts discuss your sources like a real podcast, with natural back-and-forth, examples, and analogies. It sounds surprisingly good. People use it to absorb long reports during commutes, exercise, or while cooking.
Here’s the thing most people don’t know: you can now customize it. The 2025 update added controls for tone, focus, complexity level, and even humor injection before you generate.
How to do it:
- Open a notebook with your sources loaded.
- In the Studio panel, click the Audio Overview tile.
- Before generating, click Customize. You can specify: what the hosts should focus on, the level of technical depth (beginner vs. expert), and the tone (formal, casual, etc.).
- Example prompt: “Focus on the key business risks identified in Chapter 3. Assume the audience is a senior executive with no technical background.”
- Click Generate. It takes a few minutes.
- Once done, click Join to enter Interactive Mode. You can raise your hand and ask follow-up questions in real time while the audio plays.
On the free plan, you can generate up to three Audio Overviews per day. The Interactive Mode (where you join the conversation live) is one of the more genuinely impressive AI experiences right now.
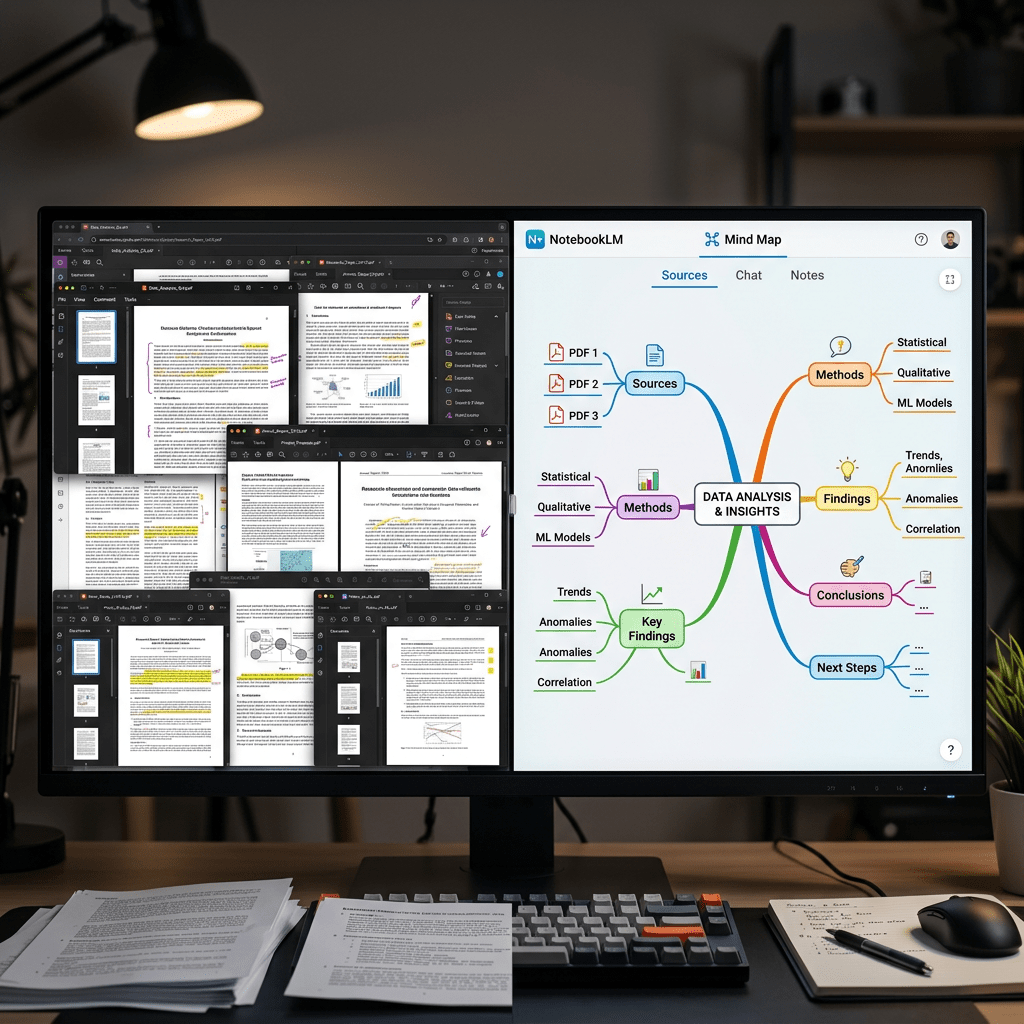
Tip 3: Use the Mind Map to Find Connections You Missed
If you have a notebook with multiple complex sources, the Mind Map is the fastest way to understand the big picture before you dig into specifics. It generates an interactive visual diagram of the key concepts in your sources and how they relate to each other.
The useful part: every node is clickable. Click a topic and it opens a focused chat about that concept, pulling only from the sources most relevant to it.
How to do it:
- Load at least two or three sources into a notebook.
- In the Studio panel, click the Mind Map tile.
- Wait for it to generate (usually under a minute).
- Explore the map by clicking on nodes. Each one opens a chat window grounded in that specific topic.
- Use this before reading all sources to identify which areas deserve the most attention.
This is particularly good for academic research, understanding a new industry, or preparing for a complex client meeting where you need to know what you don’t know.
Tip 4: Use Fast Research to Source Your Notebook Automatically
One of the features that flew under the radar: NotebookLM can now find and suggest sources for your topic, so you’re not starting from scratch.
How to do it:
- Create a new notebook and click the Discover Sources button (in the Sources panel on the left).
- Type a specific research question. The more precise, the better. Instead of “AI in healthcare,” try “AI diagnostic tools for radiology in clinical settings 2024.”
- Choose Fast Research for a quick set of 10 focused results (under 30 seconds), or Deep Research for a broader set that takes a few minutes.
- Review the suggested sources. Select the ones you want and click Add to Notebook.
- You can also pull from your Google Drive in this same panel.
This saves the most time in the early stages of a project when you’re not sure where to look. Think of it as a curated search that skips the spam.
Tip 5: Convert Your Research into a Slide Deck in Minutes
If you regularly turn research into presentations, this one will save you hours. NotebookLM can generate a structured slide deck from your sources, and you can now revise individual slides with a text prompt without regenerating the whole thing.
How to do it:
- Load your research sources into a notebook (reports, articles, data sheets, etc.).
- In the Studio panel, click the Slide Deck tile (under the Study Tools or Output sections, depending on your version).
- Add a customization prompt before generating, like: “Create a 10-slide executive summary focused on market opportunity and competitive risks. Use a professional tone.”
- Once generated, click into any slide you want to change and type a revision prompt: “Update slide 4 to include the pricing data from the second PDF.”
- Export as PPTX to bring it into PowerPoint or Google Slides for final polish.
Pro tip: if your organization has brand guidelines (specific fonts, colors, formatting rules), paste them into a text source and upload it before generating. NotebookLM will attempt to match the style.
Tip 6: Create a Study System That Actually Sticks
Students have been using NotebookLM to study for a while, but most just ask it to summarize. Here’s a more structured approach that uses multiple output types together.
How to do it:
- Upload your course materials: lecture notes, textbook chapters, past papers, or readings.
- Generate a Study Guide first (Studio panel > Study Guide). This gives you a structured breakdown of key concepts.
- Then generate Flashcards from the same sources for active recall practice.
- Run a Quiz to test yourself. NotebookLM generates questions based on your sources, not generic internet content, so it’s actually relevant to your exam.
- For topics you’re finding confusing, use the Audio Overview with a prompt like: “Explain the concept of opportunity cost as if I’m new to economics. Use simple analogies.”
- Use the Mind Map to visualize how topics connect across chapters.
You can generate multiple outputs from different chapters and keep them all inside the same notebook. The Studio panel stores everything so you can come back to any output.
Tip 7: Use NotebookLM to Process Your Meeting Notes at Scale
This is one of the most practical use cases for professionals: drop your meeting transcripts and notes into a notebook and then query them like a database.
How to do it:
- After each meeting, export or copy the transcript (from Zoom, Google Meet, or Otter.ai) and paste it into NotebookLM as a source. Give each source a clear title with the date.
- Do this consistently over a few weeks or a month.
- Now you can ask things like: “What did we agree on regarding the product launch timeline?” or “Which concerns came up most often across these client calls?”
- Generate a Briefing Document from the meeting notes to create a clean summary you can share with your team or leadership.
- Generate a Timeline output to see how decisions evolved over time.
This is also useful for journalists, consultants, and researchers who do a lot of interviews. Load all your interview transcripts and start finding patterns across them.
Tip 8: Build a Second Brain Across Multiple Notebooks
One notebook is useful. A system of notebooks is a second brain. The key is to structure them properly so you can find what you need without digging.
Suggested notebook structure for knowledge workers:
- Active Projects: One notebook per live project. Load all relevant documents, briefs, research, and notes. Archive when the project ends.
- Learning Library: Books, courses, and articles you’re working through. Generates excellent Audio Overviews for passive learning.
- Competitive Intelligence: Load competitor websites (paste as URLs), press releases, and earnings transcripts. Ask it to identify positioning and messaging patterns.
- Meeting Archive: A rolling notebook of meeting transcripts for ongoing client relationships or internal team meetings.
- Personal Reference: Saved articles, newsletters, and long-form reads you want to be able to query later.
Within each notebook, use the Save to Note button aggressively. Every useful answer you get from the chat can be saved as a note, turning your queries into a growing internal knowledge base.
Tip 9: Generate Video Overviews for Complex Topics
The Video Overview feature is newer and still evolving, but it’s genuinely useful for turning technical or data-heavy material into something a non-specialist can watch and understand. Think animated explainers with narration, generated from your own sources.
How to do it:
- Load your sources into a notebook. Works best with structured material: reports, research papers, technical documentation.
- In the Studio panel, click the Video Overview tile.
- Choose a format: Brief (short, high-level) or Explainer (longer, more detailed).
- Select a visual style: whiteboard, watercolor, kawaii, or classic. Whiteboard works well for professional audiences; kawaii is surprisingly engaging for educational content.
- Add a focus prompt: “Focus on the three main risks identified in the report. Target audience is a senior manager with no technical background.”
- Generate and download for sharing or embedding.
Video Overviews are available in 80 languages, which makes them useful for teams and organizations working across regions.
Tip 10: Use NotebookLM as a Pre-Gemini Brainstorm Layer
Here’s a workflow most people haven’t tried yet. NotebookLM and Gemini are designed to work together. The idea: brainstorm freely in Gemini (or any general-purpose AI), then bring the outputs into NotebookLM to ground them in your specific documents.
How to do it:
- Use Gemini to brainstorm, outline, or explore a topic freely without constraints.
- Export or copy that output (a rough outline, a list of angles, a set of questions).
- Paste it as a source into NotebookLM alongside your actual research documents.
- Now ask NotebookLM to expand on each point using your verified sources. It will connect your brainstorm to real evidence.
- Use the Briefing Document or Report output to get a structured, cited version of your thinking.
This also works in reverse: use NotebookLM to extract the key insights from your documents, then take those findings into Gemini or ChatGPT for broader creative work or content generation. The two tools complement each other better than either does alone.
A Few Practical Limits to Know
NotebookLM is good at working with what you give it. It’s not good at accessing things you didn’t give it. Paywalled pages, private databases, and sites that block scraping won’t load as sources. Audio and video sources get transcribed, so only the text comes through, not the visuals.
Each source file has a 200MB size limit. The free plan caps Audio Overviews at three per day. The Mind Map doesn’t yet support custom prompting to shape how it generates, which can be frustrating when you want it to emphasize specific themes.
None of these are deal-breakers. They’re just things to plan around.
Where to Start If You’re New
Don’t try to use every feature at once. Pick one use case that maps to something you actually do this week:
- Have a long report to read? Load it and generate an Audio Overview.
- Prepping for a meeting on a topic you don’t fully know? Load three background articles and use the Mind Map.
- Studying for something? Load your course notes and run through the Quiz feature.
- Turning research into a deck? Load your sources and try the Slide Deck generator.
Start there. Once you’ve used it once for something real, the rest of the features start to make sense on their own.
NotebookLM is one of a small number of AI tools where the gap between what most people use and what it can actually do is genuinely large. That gap is where your time savings live.
Sources
- Google Blog: NotebookLM Video Overviews and Studio Upgrades (January 2026)
- Google Workspace Updates: Mind Map and Language Selector (March 2025)
- Google Blog: 8 Expert Tips for Getting Started with NotebookLM (January 2026)
- KDnuggets: Advanced NotebookLM Tips for Power Users (April 2026)
- Jeff Su: What Changed in NotebookLM and What Matters in 2026 (March 2026)
- Wonder Tools: NotebookLM Complete Guide (December 2025)
- DigitalOcean: What Is NotebookLM? Features and How to Use It in 2026
- XDA Developers: 4 Productivity Tricks from a NotebookLM User Since Day One (April 2026)
The people who get the most out of NotebookLM are the ones who stop treating it like a search engine and start treating it like a thinking partner. Give it the right material, ask the right questions, and it genuinely changes how fast you can move from raw information to something useful.

Leave a comment